Testing if an array contains specific desired values: // initializing an array with specific values const premiumUsers = [ ‘Sachin’, ‘Rahul’, ‘Shoaib’ ]; // test() contains expect() that looks for a match test(‘test for specific values in premiumUsers’, function() { // expecting the array containing two specific values expect(premiumUsers).toEqual(expect.arrayContaining([‘Rahul’, ‘Shoaib’])); // or, expect(premiumUsers).toContain(‘Sachin’); })
// The above test will result in a PASS success.
Testing the summation result of a calculation: // testForAddition.js testForAddition: (num1, num2) => { return (num1+num2) },
// testForAddition.test.js test(‘test of adding two numbers’, function() { expect(testFns.testForAddition(112, 67)).toBe(179); });
The above test should pass with the following result:
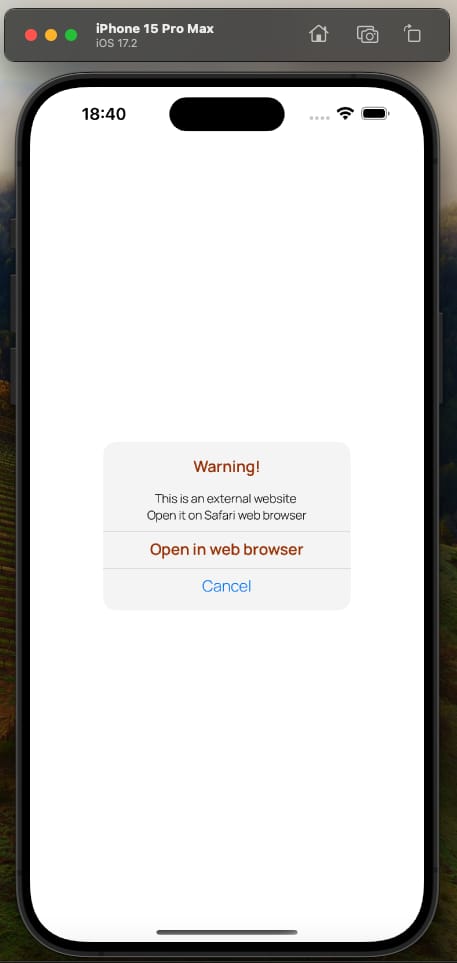
Background Story: iOS apps typically use an in-built .alert function (found in SwiftUI framework by default). It is quick to implement but difficult to modify if a client demands a specific design.
Example Use Case: If a design requires to implement an alert dialog box that has multiple buttons or different customized colors for each text lines, the default .alert function would not be fit for such a specific client demand. In similar cases, iOS developers need to implement their own custom alert boxes that meet the clients’ demands.
Code:
import SwiftUI

struct CustomAlert: View {

// to open a URL in the web browser
@Environment(.openURL) var openURL

// to switch the alert on or off
@State private var showingAlert = true

var body: some View {

NavigationView {

  VStack(alignment: .center) {

         Text("Warning!")
           .foregroundStyle(.A_23704)
           .font(.custom("Manrope-SemiBold", size: 17))

         Text("This is an external website")
           .font(.custom("Manrope-Light", size: 13)).padding(.top, 1)
    Text("Click to open it on web browser")
      .font(.custom("Manrope-Light", size: 13))
      .padding(.bottom, 1)

    Rectangle()
      .fill(.a1A1A1)
      .frame(width: 283, height: 0.3)

         Text("Open in web browser").foregroundStyle(.A_23704)
           .font(.custom("Manrope-SemiBold", size: 17))
           .padding(.bottom, 1)
           .onTapGesture {
             openURL(URL(string: "https://www.banbox.in")!)
           }

    Rectangle()
           .fill(.a1A1A1).frame(width: 283, height: 0.3)

         Text("Cancel").foregroundStyle(.blue)
           .font(.custom("Manrope-Light", size: 17))
           .onTapGesture {
             // tapping Cancel may put the custom alert box down
             showingAlert = false
           }
       }
       .frame(width: 270, height: 184)
       .background(Color.F_5_F_5)
       .cornerRadius(14)

  }
 }
}

Preview {
CustomAlert()
}
So, this is how a custom alert dialog box can be implemented using Swift for iOS apps.
Introduction: The task is to test if a given string (s) can be a prefix of a given array (words). It is a String challenge usually asked at programming contests and coding rounds during the job interviews.
Description: A string s is a prefix string of words if s can be made by concatenating the first k strings in words for some positivek no larger than words.length. Return true if s is a prefix string of words, or else return false.
Algorithmic steps to make the solution:
1. Starting with a blank string (to be populated) 2. Traversing through the array (i.e. named words) 3. Adding per traversed element to the blank array of (1) and comparing if the given string (‘s) matches the currently populated blank string of (1) 4. Return true if 3 is successful 5. Return false if (2) has completed with no success in (3) 6. End of the program
Solution in Swift programming language:
class Solution { func isPrefixString(_ s: String, _ words: [String]) -> Bool // string to be populated later to compare var stringWords = String() for i in words { // adding 1 element and checking to see if already has matched, else adding another stringWords += i // returning as soon as the so far added prefix ‘stringWords’ has matched ‘s’ if s == stringWords { return true } } // when no prefix has matched at the end of traversing loop return false } }
Sample test case:
Input: s = “Quranhasmessages”, words = [“Quran”,”has”,”messages”,”mysterious”] Output: true Explanation: s can be made by concatenating “Quran”, “has”, and “messages” together.
Introduction: The Two Sum is a well-known challenge on online coding platforms (Link) where the sum of two elements of a given array need to be equal to a given target integer.
Approach: In multiple ways, this challenge can be solved. One way is to run two loops (nested) and check if any two values of the iterated array sum up to the target, and finally return the indices of those two elements. The program below shows Two Sum in Swift using two loops and variables:
import Foundation class Solution { func twoSum(_ nums: [Int], _ target: Int) -> [Int] { let size = nums.count for num in 0 ..< size { for next in num + 1 ..< size { if nums[num] + nums[next] == target { return [num, next] } } } return [] } }
Time Complexity: n2 ;[n equals to the number of elements]
Optimized Approach: Using a Hashmap (also known as Hash table or dictionary in Swift), this challenge can be solved by calculating if the result of reducing one element from the target exists in the given array. It significantly reduces the runtime. An optimized solution of the Two Sum challenge using Hashmap in Swift is written below:
import Foundation class Solution { func twoSum(_ nums: [Int], _ target: Int) -> [Int] { var hashmap = [Int: Int]() var size = nums.count for i in 0 ..< size { var remainder = target – nums[i] if hashmap.keys.contains(remainder) { return [i, hashmap[remainder]!] } else { hashmap[nums[i]] = i } } return [] } }
Time Complexity: O(n)
So, using Hashmap (also known as Hash table or dictionary in Swift) rather than nested loops significantly reduces the runtime from O(n*n) to O(n).
The “Tower of Hanoi” is a well known puzzle. There are 3 pegs with numbers 1, 2 and 3. N disks of different diameters are set on the first peg in the following order: The lower disk is set, the larger diameter it has. Your aim is to move all disks onto the second peg using the third peg as an auxiliary one. Following the rules within a move it’s allowed to replace only one uppermost disk. Besides, it’s forbidden to put the disk of the bigger diameter onto the disk of the smaller one.
I have recursively solved the Tower of Hanoi problem in the Swift programming language that has O(2 power n) time complexity with an O(n) space complexity.
Tower of Hanoi solution in Swift (version 5.9) is written below:
import Foundation

class Hanoi {

func towerOfHanoi(_ number: Int, _ from: String, _ to: String, _ reserve: String){

  if (number == 0){
    return
  }

towerOfHanoi(number - 1, from, reserve, to)
print("Moved \(number) from \(from) to \(to)")
towerOfHanoi(number - 1, reserve, to, from)

}
}

// driver code to test the above-written solution
var tower = Hanoi()
tower.towerOfHanoi(2, "sourceRod", "destinationROD", "temporaryROD")
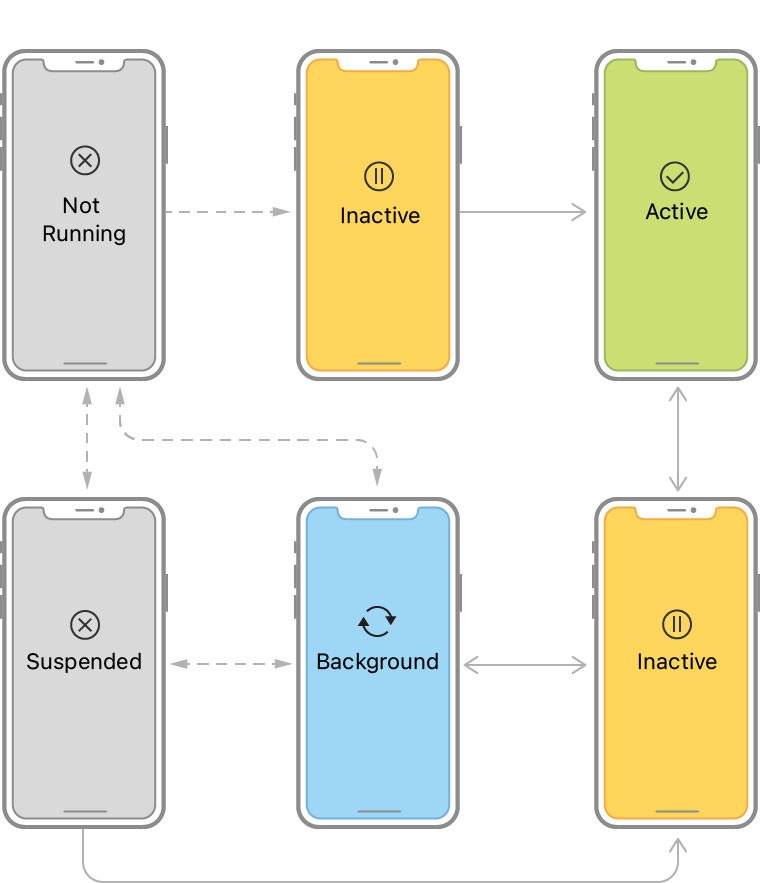
A state determines what an app can do and what it can not. So, it is essential to understand an app’s life cycle to assign right tasks at the right time.
App States:
1. Not Running/Unattached: During this state, an app does not consume any resource as the app has not been clicked to open yet. 2. Foreground Inactive: The app is in Foreground Inactive while app setups are being done and a splash screen is visible to the user. 3. Foreground Active: During this state, the app is visible to the user. The app gets highest priority to consume system resources over other tasks on the phone. The user usually interacts with the app’s UIs at this phase. 4. Foreground Inactive: This phase takes place when the user minimizes the app to use something else. At this stage, the app still is on RAM and thus is able to access system resources. 5. Background: When the app is not visible in the foreground but tasks (such as playing an audio file or downloading a file over the internet) are running behind the screen, this is called a Background state. During this phase, an app has limited access to system resources. 6. Suspended/Terminated: The app enters into this state as the user kills the app. The app completely loses access to system resources usually at this state.
The above mentioned states are managed by the following Swift methods (excluding parameters for the ease of understanding here) in an iOS project:
1. application(): This method initiates the setup tasks essential to run the app. 2. sceneWillEnterForeground(): The user sees the app visible on the screen after this method is called. 3. sceneDidBecomeActive(): This method informs the delegate that the app is active on the screen. 4. sceneWillResignActive(): When the app is about to leave the foreground state (screen), this method is called. 5. sceneDidEnterBackground(): This method informs the delegate that the app is in background state. 6. applicationWillTerminate(): Before the app is about to be terminated, this method is called.
An iOS app goes through these phases as an user interacts with the app. The featured image can be found on Apple’s developer documentation link.
Problem Statement: You are given an array of strings names, and an array heights that consists of distinct positive integers. Both arrays are of length n. For each index i, names[i] and heights[i] denote the name and height of the ith person.
Return names sorted in descending order by the people’s heights.
Algorithm:
1. Merge the arrays into a structure (like zip) 2. Sorting that structure in descending order (as required) 3. Transforming the structure to represent the String-array portion 4. Returning the result from step 3
Solution using Swift programming language:
import Foundation
class Solution { func sortPeople(_ names: [String], _ heights: [Int]) -> [String] { // zip() to join two arrays and map{} to detect the String type array let result = zip(heights, names) .sorted{$0 > $1 } .map{ $0.1 } return result } var solution = Solution() print(solution.sortPeople([“Mary”,”John”,”Emma”], [180,165,170]))
A palindrome is a number, sentence or word that reads the same forward and backward. Even a DNA structure can be a palindrome. It has significance in various branches of higher research.
Word examples: madam, bob Numerical examples: 101, 191 Date & Time examples: 12:21, 11/11/1111, 12/12/2121 Sentence example: Rats live on no evil star
Although mostly numbers are tested to be palindrome, here we shall test if a given sentence or word is Palindrome.
Steps: 1. Using a function to take an input to test 2. Making the input lowercase 3. Reversing the input 4. Comparing the reversed input with the original lowercase input
Palindrome program in Swift language:
import Foundation
// function to check if the input is a Palindrome func palindromeTest(_ inputString : String) -> Bool{ // making the input lowercase let lowercasedInput = inputString.lowercased() /* comparison of the reversed with the original will return True if it is a palindrome */ return lowercasedInput.reversed() == Array(lowercasedInput) }
// Any word or sentence can be passed from here to check print(palindromeTest(“Quran”))
Introduction: Euler’s Number , also known as Euler’s Constant and denoted by ‘e’ is a constant value as well as an irrational number . Its approximate value is 2.718281828459045, or 2.71828 in short for quick calculation . Most modern programming languages include this value in their Math libraries, for example: C++’s exp() or Dart’s e displays the Euler’s Constant .
We shall write a Dart (Flutter) program to calculate the Euler’s Number, ‘e’ :
import ‘dart:math’;
// class to work with Euler’s value class CalculateEuler{
// method to calculate ‘e’ void calculateEuler(){
// taking a specific constant named special_constant to calculate ‘e’ int special_constant = 99999991726;
// calculating ‘e’ without Math library’s assistance num calculated_euler = pow((1 + (1/special_constant)),special_constant);
// taking an instance of CalculateEuler class CalculateEuler euler = CalculateEuler();
// calling the method on the instance euler.calculateEuler();
// displaying the original value of ‘e’ from Dart’s Math library print(“Actual e: ” + e.toString()); // print(exp(1)) displays the same value of ‘e’ }
The calculated value in this Dart (Flutter) program results in 2.7182818284464436 that is close to the actual value of ‘e’ (i.e. 2.718281828459045) that is showed as well .
Applications of Euler’s Number:
‘e’ is found to be used far and wide, including but not limited to: 1. Probability 2. Radioactivity 3. Pharmaceuticals 4. Bernoulli Trials 5. Standard Normal Distribution
Isolate: An isolate is a specific chunk of memory generated by Dart to handle specific tasks . One isolate can be tasked to handle a single or multiple tasks asynchronously . If there is a need to perform high-computation or intensive task, that is where isolates enable Dart to achieve concurrency and multithreading . An isolate’s concept may sound similar to multithreads in other languages .
Isolate Advantages: 1. Achieving Concurrency 2. Each isolate’s state is secured from other isolates’ interference 3. No Mutex or Thread Lock due to separate memory heap for each isolate 4. Performing multiple independent tasks at a time 5. Offloading heavy computation to worker isolates (as background workers)
Async-Await: ‘async’ and ‘await’ are two keywords reserved in Dart language and used with Flutter . When the main isolate does multiple works at a time to get things done faster, this characteristic is called to be asynchronous . ‘await’ keyword is used before the function that runs to bring the result .
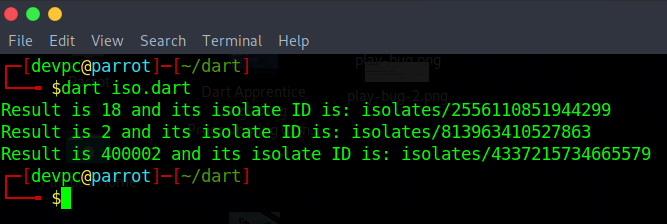
The Dart program below implements isolates to calculate separately and finally displays each Isolate’s ID:
import ‘dart:isolate’; import ‘dart:developer’;
// iso() takes a number and performs addition using specific different Isolates void iso(var n){ print(‘${n+n} and isolate ID is: ‘); // displaying Isolate ID to ensure the difference print(Service.getIsolateID(Isolate.current)); }
void main() async { // Spawning (Producing) three different Isolates await Isolate.spawn(iso,9); await Isolate.spawn(iso,200001); await Isolate.spawn(iso,1); // The kill() function kills an Isolate // Isolate.kill(priority: Isolate.immediate); }
Calculation using Isolates
Communication Between Or Among Isolates By Message Passing
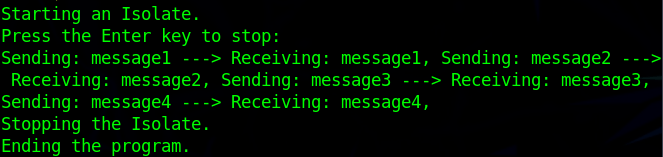
One isolate can not interrupt another isolate’s state, data or memory. When they need to communicate with each other, an isolate passes asynchronous messages through a SendPort and the intended receiver isolate receives those messages through its correspnding ReceivePort .
The Dart program below highlights message passing between isolates:
void main() async { stdout.writeln(‘Starting an isolate.’); await start(); stdout.writeln(‘Press the Enter key to stop.’); await stdin.first; stop(); stdout.writeln(‘Ending the program.’); exit(0); }
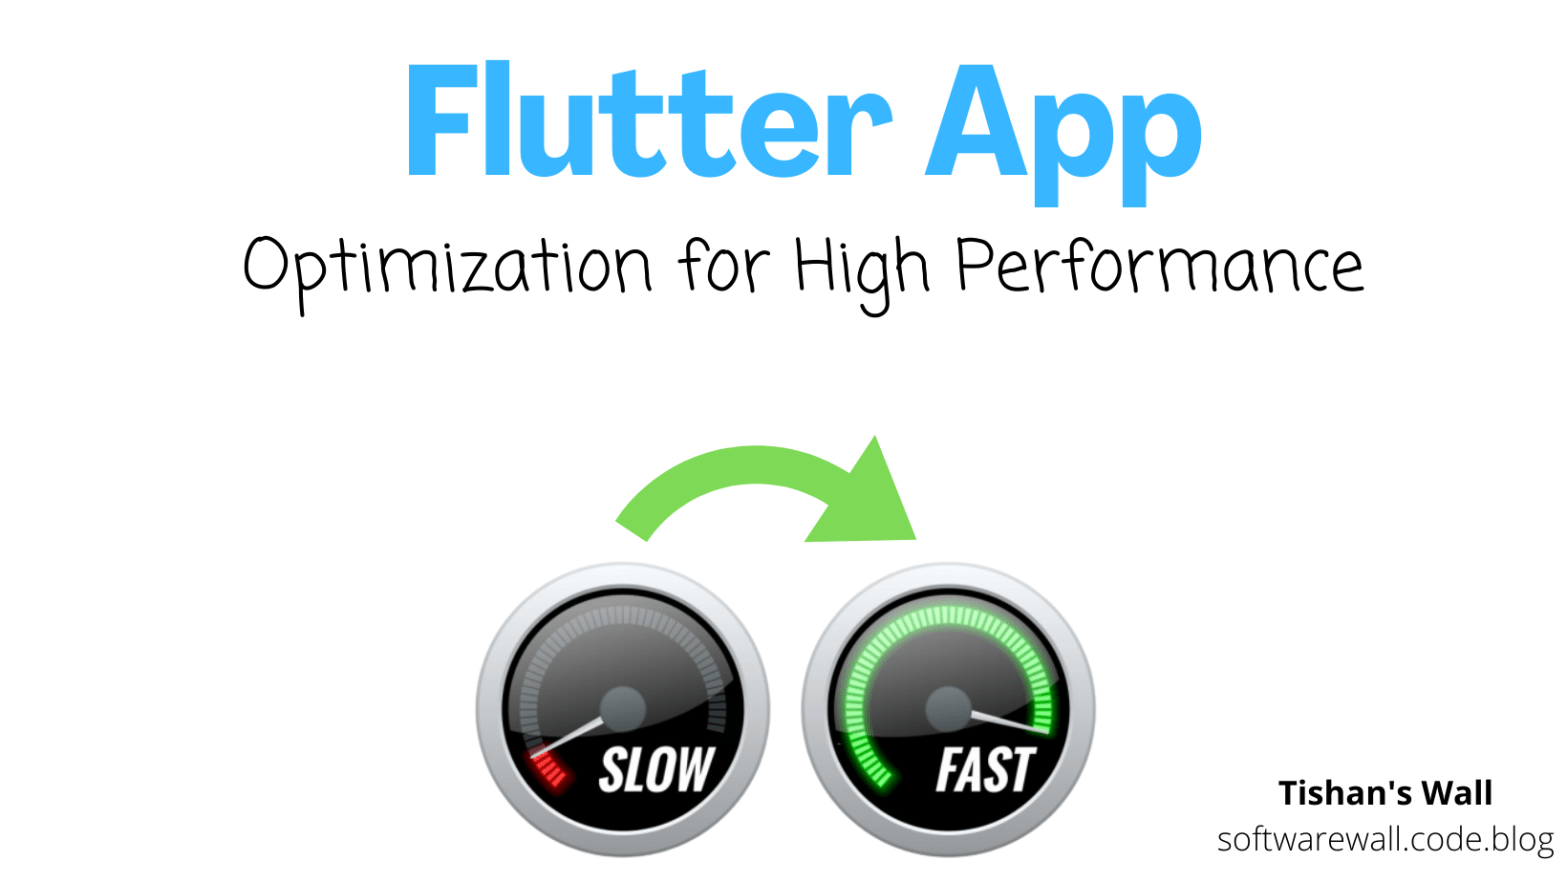
Flutter is performant by default . Developers behind Flutter and Dart have spent an enormous amount of time to make their performance near-native . However, as we have recently developed & released the Rokomari app , Bangladesh’s largest online bookseller app using Flutter (Dart) – I have found several peak-points that require optimization .
Flutter, powered by Dart language, is an open-source SDK by Google to develop apps for Android, iOS, Linux, Windows, MacOS and the web from a single codebase .
Here, I share tips to optimize a Flutter app, from my experience, that scales:
Avoid heavy-works on the main thread
Employ isolates wherever necessary
Mark static widgets as const
Avoid rebuilding widgets
Remove Container() if unnecessary
Prefer SizedBox() or Nil() instead of blank Container()
Use StatelessWidget if StatefulWidget is of no use
Keep the Widget build() as simple as possible
Avoid color gradients
Add shrinkWrap:true to ListView.builder
Apply RepaintBoundary() in animation works
Cache both local and networked images
Employ dispose() to release object memories
Compress (encode and decode) data
Make Color codes const
Keep Flutter and Dart up-to-date
Produce architecture-specific builds separately for phones, tablets and desktops
These tips will ensure a fast & lightweight high-performing Flutter app that runs on multiple platforms .
What is State Management? The state of an app is any data that exists in the memory when the app is running . This state is crucial to rebuild the UI . It may range from assets to variables whose change of value may affect the UI .
What does Provider do? Provider is Google’s recommended way of handling an app’s state . It can be imported and used in the form of a package available at www.pub.dev .
Advantages of Provider (1) Change of state across the app (2) Low complexity (3) Developer-friendly
Steps to Provider (1) Install the package (2) Import the package (3) Declare the class name and the widget name inside ChangeNotifierProvider (4) Put business logic or the values to be updated inside Change Notifier followed by notifyListeners() to listen for change (5) Call the function to activate and view the state change inside a widget or class
void main() { // Declare the class name and the widget name inside ChangeNotifierProvider runApp( ChangeNotifierProvider( create: (_) => CountNotifier(), child: CounterApp(),), );}
// logic or the values to be updated stay here class CountNotifier with ChangeNotifier { int _counter = 0; int get counter => _counter; void incrementCounter() {
// testing the value change in Log / Run using debugPrint() debugPrint(“Incrementing and notifying”); _counter++;
// using listeners to notify the change notifyListeners(); }} class CounterApp extends StatelessWidget { @override Widget build(BuildContext context) { return MaterialApp( debugShowCheckedModeBanner: false, theme: ThemeData( primarySwatch: Colors.blue, visualDensity: VisualDensity.adaptivePlatformDensity,), home: MyHomePage(title: ‘CounterApp (Provider + ChangeNotifier)’), );}}
class MyHomePage extends StatelessWidget { final String title; MyHomePage({Key? key, required this.title}) : super(key: key); @override) Widget build(BuildContext context) { debugPrint(“Tishan builds Flutter Provider”); return Scaffold( appBar: AppBar( title: Text(this.title),), body: Center( child: Column( mainAxisAlignment: MainAxisAlignment.center, children: <Widget>[ Text(‘Your number of clicks so far today is: ‘), // updating and displaying the changed-value in a Text widget Text(‘${context.watch<CountNotifier>().counter}’, ),],),), floatingActionButton: FloatingActionButton( onPressed: () => context.read<CountNotifier>(). incrementCounter(), tooltip: ‘Increment’, child: Icon(Icons.add),), );}}
// One may display the state-change elsewhere in another widget similarly
A Palindrome number is a special type of number that reads the same if read in reverse . Problems relating to Palindrome are common in both programming and mathematics . We shall implement a program to implement Palindrome number in Swift language .
A short note on Swift: Swift is an open-source programming language developed by Apple Inc. to make apps for iOS, MacOS, tvOS & watchOS .
Steps: 1. Taking a variable to store a number (to test if that number is Palindrome) and another variable assuming as the reverse number (initially as Flag Variable, 0) 2. Reversing the original (or, taken as user-input) 3. If the reversed number equals to the original number, it is a Palindrome – otherwise not .
Program to implement Palindrome number in Swift language:
var reverse = 0 // original is the variable to be tested whether it is Palindrome or not // you may change it var original = 1111 var num = original func rever() { while(num>0){ reverse = reverse * 10 + original % 10 num = num / 10 } // comparing the reversed number to the original one if(original==reverse){ print(“\(original) is a Palindrome number.”) } else{ print(“\(original) is not a Palindrome number.”) } } // calling the function finally rever()
Dart programming language has a rich set of features ( i.e. Hot Reload, Null Safety, AOT+JIT ) powering Google’s Flutter SDK to build Android, iOS, Web, Linux, Windows & Embedded System apps from a single codebase.
A WebView mobile app shows a web application in the form of a mobile application in a flexible yet fantastic way. In simple terms, a WebView app resembles a website’s view when opened from a mobile browser.
Advantages of a webview app: 1. Replicates a website’s view inside a mobile app 2. Time-saving in terms of time-constrained development
Disadvantages of a webview app: 1. Show the features only available on the web application 2. Tough to add new feature on the mobile-side
Program (Java):
package com.khalnayak.webview;

import androidx.appcompat.app.AppCompatActivity;
import android.os.Bundle;
import android.view.KeyEvent;
import android.view.Window;
import android.webkit.WebSettings;
import android.webkit.WebView;
import android.webkit.WebViewClient;

public class MainActivity extends AppCompatActivity {

    WebView web;

    @Override
    protected void onCreate(Bundle savedInstanceState) {
        super.onCreate(savedInstanceState);
        setContentView(R.layout.activity_main);

        web = findViewById(R.id.webview);
        WebSettings webSettings = web.getSettings();

        // JavaScript must be enabled to view the site
        webSettings.setJavaScriptEnabled(true);
        web.setWebViewClient(new Callback());

        // web URL to show the view
        web.loadUrl("https://softwarewall.code.blog/");
    }

    private class Callback extends WebViewClient{
        @Override
        public boolean shouldOverrideKeyEvent(WebView view, KeyEvent event){
            return false;
        }
    }
}


GitHub Source Code link: https://github.com/Farial-mahmod/Webview-mobile-app


You must be logged in to post a comment.